Showing posts with label Tutorials. Show all posts

Sunday, April 17, 2011

February's Recipe: Boeuf à la Mode

Buffalo Mode.

That's what my family is calling it.

Technically, it's Boeuf à la Mode, so their phonetically very close.  It's a Julia Child's recipe, similar to her superduper famous Boeuf Bourguignon.  I decided not to be so cliché as to make it, but my family loooved this one! It's a roast that's braised in red wine...& I tend to think that a.n.y.t.h.i.n.g that is cooked in wine (over water and particularly oil) is worthy of enormous praise!

This was technically February's recipe, but February was so up in the air with moving that I had to postpone.  Good thing for my family, because they are getting two awesome meals in March!

This recipe was extremely time consuming (much like this blog post), but can be prepared ahead of time.  If I had marinated the night before, that would have been better. It was also expensive. While my family loved it and couldn't stop asking when the next time I would make it would be, we agreed it was a special-occasion-once-a-year sort of dish.

I served the meat with braised carrots and small white boiler onion.  I meant to serve it with red potatoes, but I completely forgot to put them in the oven.  No potatoes.

Total cook time: 12 hours, but mostly prep work.  This is a still cook meal & you should prepare the the roast to be in the oven for about 3 hours.

Serves: 10-12 technically, but more like 6 when you forget about the dang potatoes.


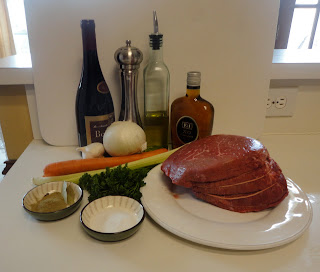
What you need!: 2 pounds of carrots, 1 white onion, 3-4 celery stalks, 1 garlic clove, 1 1/4 tb thyme, 3 bay leaves, 1/2 bunch fresh parsley, 2 cloves, 5+ lb of braising beed trimmed & tied (I used rump pot roast, but a top round or a chuck roast would work too), 5 cups (2 bottles) of a young red wine (I used Burgundy; Pinot Noir or Chianti would work well), 1/3 cup Brandy, Olive Oil, 6 tb cooking oil (I used Olive Oil again), 6 1/2 cups beef stock or bouillon, 1 pound bacon (or you can use calf's feet or pork rind...bacon worked well for me), 1 tb granulated sugar/splenda, 3 tb butter, 24-36 small white boiling onions, 1 tb cornstarch, 2 tb Madiera or port

Equipment: Large marinade bowl, A fireproof casserole or roaster large enough to hold the meat & ingrediants with a lid, tongs that hold the meat (heavy duty), heavy covered sauce pan, covered frying pan, serving platter, a slotted spoon, sauceboat (warmed), loads of utensils. Also, an old, long-sleeved t-shirt (trust me).

 1. Peel & slice 1 cup each of carrots, the white onion & celery.  For spices, prepare 2 halved garlic cloves (unpeeled), 1 tb thyme, 2 bay leave, 1/3 cup fresh minced parsley, 2 whole cloves, salt & pepper to tasted.


2. Place half of the vegetables, herbs & spices in the bottom of the marinade bowl.


 3. Put the meat in the bowl & spread the rest of the herbs and spices over the meat.


 4. Add 5 cups wine (almost 2 bottles), 1/2 cup of olive oil & 1/3 cup Brandy to the marinade. Drool a little, but be careful not to drool in the bowl.

5. Cover the marinade & refrigerated for at least 6 hours or up to one day. Every hour or so, turn & baste the meat.  I like to call this "Rubbing the Rump"

DOH!
***** Wash potatoes well & slice them in halves.  Completely disregard them when it comes time to put them in the oven. *****


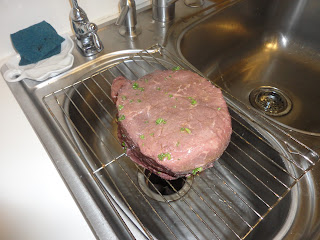
 6. When you are nearly ready to cook the meat, drain it over the sink on a rack for at least 30 minutes. Before browning, dry it completely with loads of paper towels (it won't brown if its moist)


7. Preheat oven to 350 degrees & remove all but one oven rack on the lowest possible position. Put on a long sleeved shirt that can get ruined (really...trust me)


Our antique roaster that hasn't been used in at least a decade...probably longer.


8. Add 4 to 6 tb rendered pork fat or olive oil to the roaster.

Our grilling tongs that are enormous.  They made moving/turning the roast so much easier, though!


9. When the oil/fat is smoking, brown the roast on all sides for about 15 minutes total. If you aren't wearing a long sleeved shirt, prepare to get popped by the boiling oil.


Toastin' My Roast.


10. Pour in the wine/veggie marinade. Boil it down rapidly until it is reduced by about half.  Stay in the kitchen because this smell is TO DIE FOR!


11. Add you body flavor, whichever you choose.  I chose uncooked bacon (about 3/4 pound).  Julia recommended veal knuckles, calf's feet, rind, etc. No thanks. Also add about 4 to 6 cups of beef stock or bouillon, setting aside 1/2 cup unused bouillon for the onions. The liquid should come about 2/3 up the way of the roast.


12. Bring the liquid to a simmer on the stovetop, skim off the fat & cover tightly.  Set the casserole/roaster in the oven & regulate heat to that the liquid simmers for 2 1/2 to 3 hours. Yowza!


13. Turn the meat every 30-45 minutes. 


14. I chose to prepare my sides an hour after putting the roast in the oven. I made Carrots Braised in Butter & Brown-braised Onions.  I cooked these simultaneously.


15. Peel & quarter 1 1/2 lb carrots.  Add carrots, 1 1/2 cup water, 1 1/2 tb butter, 1 tb granulated sugar (I used splenda 'cause that's what I do), 1/2 tsp salt & a pinch of pepper for a 2 quart sauce pan. Bring to a boil.

16. Cover & continue to boil slowly for 30-40 minutes until the carrots are tender & the liquid is gone, starting the onions at step 17.  At the end, I watched for the last 5 minutes so they wouldn't burn.  Season to taste & set aside to be reheated when the meat is almost done.


17. Bubble 1 1/2 tb butter & 1 1/2 tb olive oil in a skillet.


18. Add peeled white small onions to the skillet & roll the onions in the skillet.  You want them to brown evenly, but it's unrealistic to think they will be uniform. Be careful not to break their skin with too much heat.

19. Pour in 1/2 cup brown stock/bouillon to the onions, add salt & pepper & a medium sized herb bouquet of 4 sprigs of parsley, 1/2 bay leaf & a 1/4 tsp thyme tied in cheesecloth. Cover & simmer slowly for about 45 minutes until the onions are completely tender but still retain their shape & the liquid is evaporated. Toss the herb bouquet, remove from heat & set aside until you are ready to reheat & serve.

**I'm not going to lie...I wrapped my herbs in a papertowel since I didn't have the cheesecloth to make a bouquet.**

20. After 2 hours, check your meat's internal temperature.  Mine was (very) well-done (but not at all dry) at 180F , though I would have preferred medium-well at around 165-170F. When the meat is at the appropriate temperature & tender, remove it to the platter. Reduce the heat of the oven to "Warm" or the lowest possible setting.


21. Toss the strings & trim the fat.  Keep the meat warm by placing it back in the low heat oven until the sauce is ready (10-15 min.)


Nice shot, Ryan!


22. Skim the fat off of the juices & stain them through a sieve into a saucepan.  Press the liquid out of the vegetables. Simmer for a minute, then boil rapidly until the liquid reduces to about 3 1/2 cups.  Taste and carefully season.


23.  Thicken the sauce with a mixture of dissolved cornstarch in 2 tb Madeira/port wine and simmer for 3 minutes.


24.  Add the cooked carrots and onions and simmer for another two minutes to mix the flavors


25. Remove the vegetables & arrange around the roast.  Decorate with parsley.  Pour some of the sauce over the meat and place the rest in a warm gravy boat.


26. Enjoy, then pass out from a food coma and slaving in the kitchen all day.
Tuesday, June 1, 2010

I Love ORB.

I don't know who else follows craft blogging. I get a lot of my "inspiration" from some really fantastic & creative women.

House of Hepworths turned me on to ORB. Oil Rubbed Bronze. Rust-O-Leum makes this AMAZING spray paint that has taken over my apartment. I buy it in the Universal All-Surface Paint version so that I can make everything beautiful with ORB. Apparently, I'm not the only one having a love affair with spray paint.


So, how great can a spray paint be?

Rust-O-Leum is top notch to begin with: fast-drying, even coats, etc. (BTW I'm also in love with their canned High Gloss Black oil paint, which is covering two major pieces of furniture in my bedroom along with countless nic-nacs). As far as paint goes, it's the total package. I've heard Krylon also makes a good (& cheaper) spray ORB, but doesn't adhere to plastics. Still good to know for certain projects in the future.

But, there is something about this metallic-y brown-black color in a can that has my heart going pitter patter and my mind going in circles.

My first attack was the potty-wipes box. Yup...wet wipes for your butt. They are great and useful, but the containers are less than to be desired. Add ORB. MUCH BETTER!!!


Since I needed a place to keep my scrapbooking paper, I bought a storage box at Hobby Lobby. It was black, which is a problem. It didn't match the rest of my office/living decor. Problem fixed with ORB.


Ugly white trash $3 can fixed with ORB. Love that this stuff paints on plastic, plus you can really see how it covers in large amounts here.


Then, my toothbrush holder broke :o(. Since I'm out of money (no job & too much orb), I bought the cheapest I could find, made beautiful by ORB.

Solution to hiding electrical wires/surge protector on the built-ins: peg board & orb.


Once not-so-great picture frame (odd wood color & gold accents...). This picture does no justice, but I love the way it turned out.


Then, I decided to get crazy. 12/13 years ago, my dad bought my mom a BEAUTIFUL set of candlesticks from Pottery Barn. Muey expensive-o. No-tarnish silver, or so They said. These things tarnish so quickly and so terribly....usually they would only get cleaned well a couple of times a year. My mom gave them to me, after thinking about getting rid of them, when I said I would keep them polished. Nope. After 2-3 weeks tarnish would come back. (BTW, I've heard PB has changed their silver since then to really not tarnish, so not trying to bad mouth them AT ALL).

Before:


I talk to my mom before doing this, which she gave me the go-ahead to spray paint her $80 candlesticks.

After about 10 VERY VERY LIGHT applications so that I wouldn't get any drips or bubbles, here are the fabulous candlesticks that I am lusting over once more.


Looking back, a primer would have helped, but they still turned out exactly the way I wanted them to! If I ever decided I wanted them silver again, I could get out the acetone, rub away, & find a fantastic silver spray paint, but I ain't polishin'.

Thank you, House of Hepworths, for introducing me to oil rubbed bronze. Now, if only I could get all of the brown metallic paint off of my hands....

ONE LAST THING!!! If you are spray painting in the Dust Bowl or Desert (this includes almost everyone who reads my blog...), spray outside first then MOVE IT INSIDE unless you want to sand in between each.and.every.coat.

Friday, May 14, 2010

How to Clean a Room in 10 Minutes or Less

I'm really good at cleaning...I'm quick at it, & I really HONESTLY enjoy it. The only problem is that I am "stretched too thin," as are most people.

So here's how I clean a room in 10 minutes or less. Much of this is common sense, but I like to make cleaning a game (I have a couple of different games to make the process easier, particularly for bigger messes projects). I'll call the room being worked on the "project room" to avoid any confusion when I talk about other rooms!

1. Put on some music that will keep you moving & that always keeps you in a good mood. Nothing too romantic, nothing that will relax you too much, ABSOLUTELY nothing that will make you cry.

2. Set a timer (on your phone/microwave/whatever) for 10 minutes. This serves two purposes...
  • Psychologically, a race against the clock will help you stay focused...I enjoy competing against myself.
  • If you finish before the 10 minutes is up, go work on another room!! See how much you can get done.
**If you don't finish in the 10 minutes, you can either keep going or decide to call it quits (as long as you know you put forth 10 minutes of hard work, you'll feel better about it!

3. Start by removing anything that does not belong in the project room.
  • This will get rid of some of the clutter. I usually just throw it in a pile in the next room (unless it is already clean). My goal is usually just to displace the mess but completely clean ONE ROOM at a time.
4. Go through all other rooms and collect anything that does belong in the project room.
  • If you're going on a cleaning spree of room after room, this should make each consecutive room, technically, easier than the one before it! Basically, once I'm done with the bathroom, the bathroom is closed. I can then go on to the kitchen. Once I'm done with the kitchen, the kitchen is closed, etc.
5. Put away things leftover in the project room.
  • Yes, this is the most obvious part. However, all of the extra clutter is gone and everything that belongs in the bathroom is efficiently already there.
  • I usually quickly put everything into one big pile, then sort zones (ex. closet, right side of room, left side of room, trash, etc.). I can more efficiently put things away if everything in a small pile is going to the same place.
6. Use quick-clean items, like swiffer cloths or clorox wipes, if needed.

7. Run a sweeper/broom/vacuum over the floor. This makes such a big difference!!!

8. Spray room with febreeze &/or air freshener. Also makes a big difference!!!

9. Light a candle, if you wish, as a finishing touch!

**Of course, 6-9 are optional & in addition to getting rid of little messes, but are great finishing touches to make your place seem welcoming, clean and cozy.

10. You're DONE!!

This is not about a perfectly clean room! That can take me hours. This is all about making a big dent in a short amount of time.

If you're in for a real challenge, adopt the same concept, set the timer for 15 minutes, and do this through your entire apartment/house. You'd be surprised at how much of a difference it makes....but it's so worth it :o).

Friday, January 29, 2010

This one's for Hoonie.

I swear...I should get snowed in every week! I have gotten so much done, and it feels GREAT! I've been cleaning, grooming, blogging, finishing old projects, starting new ones, and getting caught up on Lost. Hopefully I'll keep blogging after snowy weather goes away, because I really have been enjoying it.

I also watched 6 episodes of Lost this afternoon. While I watched season 1 & 2 in real time, I stopped paying attention by third season. Last year about this time, I restarted from the beginning to pass the time after my foot surgery. I got completely caught up until the beginning of season 5, then I was forced to wait for either (a) ABC.com to put the episodes up, or (b) the box set to come out. So, at the end of December I rewatched the finales of 4, and got 1 whole episode of season 5 out of the way. I realized about a week ago that I was running out of time, so I started watching again, and I should be done with season 5 by Tuesday!!! IN TIME FOR THE PREMIER!! Anywho...that's not what this blog is about.

I: Video for Jaymee. And everyone -- this is my favorite video of all time. Turn up the sound.


This is my cousin's youngest daughter, Trynnity. She is 3, and she is adorable. When I was in Tucson earlier this month, I was getting ready in the bathroom and the iPod was playing. I came out of the bathroom to see this!!!

II: Corkboards for Jaymee!

Also when I was in Tucson, Jaymee and I wanted to make cute corkboards and frame them. After a rude confrontation with store employees, we left the craft store with no cork and no frames.

Personalized Cork Boards

You will need:
3-4 8x10" Frames, depending on how you want to arrange them. (Mine were 97 cents each at Wal-Mart)
1 pack of cork squares, contains 4 ($5 at Wal-Mart)
Painting supplies to decorate the cork & frames.
1 pack of Make Your Own Stencils, contains 3 (These were about $7 at Hobby Lobby. They were pricey, but if you're doing an intricait design, well worth it!! I still have 2 left over, too.)
1 x-acto knife
Scissors
3m strips

1. Start with your cork squares. Measure and cut them down to your frame size with the x-acto knife.
2. Paint the frames, if desired

3. Chose your design to go on the frames. I used Google Images to search for a large damask pattern that I could zoom in on.

4. Trace your design onto the stencil template. Cut out the template. (THIS WAS A LONG AND LENGTHY PROCESS!!! It's hard to maneuver the stencil template with the scissors, and the stencil was to tough to use the x-acto. For such a detailed pattern, I was happy with the labor and results, but it's up to you what goes on the cork boards)

5. Use the stencil to transfer the pattern to the cork board

6. Paint the pattern. Apply 3-4 coats. (really)

7. After allowing to dry, assemble your cork boards.

8. Hang with 3-m strips, being sure to level your frames and keep an equal distance between frames (my frames wouldn't allow me to nail in picture hangers into the wood)


9. ENJOY!!!


III. Follow Your Bliss, for me :o).

I had been wanting a to make a cute little sign like this for a while. I was drawn to the one-word signs made out of cut out letters that say "indulge," "family," or "home"...I just wanted an original one.

I have been particularly fond of the mantra "Follow Your Bliss" by Joseph Campbell. An American philosopher, he once wrote : "If you follow your bliss, you put yourself on a kind of track that has been there all the while, waiting for you, and the life that you ought to be living is the one you are living. Wherever you are—if you are following your bliss, you are enjoying that refreshment, that life within you, all the time."

Basically, if you do what naturally makes you happy every day, if you follow the path that this happiness leads you on, you will find your true calling.

Here's my "Follow Your Bliss" sign. It cost about $15 to make, and I got everything at Michael's.


I put on my entry table so that it's the first thing I see every time I walk into my apartment!